Nonprofits are a whole different animal when it comes to accounting. In some ways, this can be easier, but there are other aspects that can prove more challenging. Getting the accounting system for your nonprofit set up correctly is the best way to start off on the right foot as your organization begins to grow.
I firmly believe that nonprofits should be run just like a business; not doing so can quickly lead to failure of the organization, which hurts everyone from the founder to the Board to members to donors to the community at large. It doesn’t matter where your passion lies – these same concepts apply whether your nonprofits serves homeschool families, the elderly, the indigent, the disabled, foster kids, neurodiverse kids, a garden center, a community center, the animal shelter, churches, Christian ministries, social clubs…the list goes on. If your expenses exceed your income, you will ultimately fail, so it behooves you to keep track of everything properly so you know where your organization stands, financially, at any given time.
So, with this in mind, what is the best way to set up a nonprofit organization on QuickBooks Online?
I want to preface this by emphasizing that the majority of nonprofits are very small. They are led by volunteers who make the most of a limited budget so they can further their cause. They have no employees and are run by a passionate working Board of Directors. The money out is often pretty close to the money in. Getting grants might be a goal for the future, but for now, the work revolves around trying to fundraise enough to serve a few folks and make their lives a little better.
This article is intended for the Board members running these organizations that are operating on a shoestring with hopes of making a real impact. If you are already to the point of winning grants that have reporting requirements, or bringing in enough revenue to be subject to more complex regulations, or you have enough income to afford a paid executive director, this article is probably not going to meet your needs since your org is beyond the level discussed here. However, if you are not set up in QuickBooks and you’re looking to make the move over, please do keep reading so you have an understanding of the best way to get started with using QuickBooks Online for your nonprofit organization.
Setting Up Your QuickBooks Online File
The first order of business is to obtain the software. If you are a 501(c)(3), you can apply for a copy through TechSoup. They will verify your organization and that you are authorized to represent the organization, and then you will be allowed to request different software programs. The companies make these available in limited quantities, and the fee you pay is to TechSoup for administration. At the time of this writing, it’s $80 annually for a QuickBooks Online Plus subscription – a major, major discount from the regular price of $90 something a month!! You can also get QuickBooks Online Advanced if you need additional capabilities, but the majority of organizations would likely be okay with Plus.
So, once you have gone through the activation process on your new subscription, it will walk you through setting up your organization on it. In assuming this is your first foray into QuickBooks, I’m not going to address if you need to migrate a file from QuickBooks Desktop, although I may write another article about that at some point in time. You’ll go through the various screens which ask your organization’s name, your industry, what type of organization you are (make sure you select nonprofit here), how you make money, and what your role is at the organization. (Keep in mind that Intuit is CONSTANTLY making updates to the software, so your set of questions might be a little different from this.)
You will have a chance to start connecting various apps, your bank account, etc., but hold off on this part for right now. You don’t want the program to start pulling data from other places just yet. I suggest bypassing all the rest of the guided setup and just getting into QuickBooks after those basic questions about your organization.

Account-level Preferences in QuickBooks Online
The next part you will want to set up is going to be under the gear icon on the upper right side of your screen. Click that, and then go to the option on the top left, Account and Settings. Once that loads, you can access the best customizations you can do within QuickBooks Online. Here is a rundown of this section.
Company
- logo and name
- EIN
- which IRS tax form you use (there’s only one option for nonprofits here, the 990)
- organization address(es)
- contact info
Sales
Skip down to where it says Sales now.
- invoice and receipt customization – takes you to a new screen, so you can play with this later
- sales form content – note how everything is geared toward nonprofit language rather than for-profit language
- I like to turn on custom transaction numbers so it will assign a unique number to each receipt you enter
- I leave the rest turned off, but you might need a service date on your receipts, and you may want to utilize tags to help you find things later, but usually just developing a good system for entering memos when you are booking transactions is good enough
- invoice payments
- you will need to go through a process with QuickBooks to set up the ability to receive payments, much like a merchant account. Many orgs do not use QuickBooks for invoicing or paying bills, so you can skip this section if you have another way you prefer to accept money
- products and services
- you will WANT to show what your members/donors are purchasing when possible. This is another step to set up that we’ll go over later (setting up products), but for now, just toggle that button on
- you can track inventory if you have it, but if you’re selling services, it’s likely you don’t have any inventory to track anyway, so you can toggle that button off
- late fees if you want to assess them
- progress invoicing – you most likely will not use this
- messages – you can access this email confirmation message when you’re doing the invoice customization mentioned above
- reminders
- online delivery of sales forms
- show aging table – unless you allow people to pledge now and pay later, you can skip this (better known as A/R in the corporate world)
Expenditures
- bills and expenditures
- turn on show items table
- turn on track by customer
- you can turn on tags here if you’d like
- purchase orders – turn on if you use them
Payments
You probably will leave this off unless you need to accept payments (like a merchant account) through QuickBooks. This is a great tool if you aren’t sure what else you could use, and rates are comparable to what other companies charge. It is also very convenient to just send an invoice through QuickBooks Online and accept payment that way, too. That said, there are a variety of ways you can accept payments through other software you may already be using, so this will ultimately be a judgment call based on your organization’s specific needs. For example, homeschool co-ops using Homeschool Life for their web hosting will have access to running payments through the website using a merchant processor that passes fees to the customer, making your accounting a little easier. On the flip side, it’s not always as easy as it could be since some of these programs do not sync with QuickBooks, so booking payments is a manual process for your treasurer or paid bookkeeper.
Time
I don’t have any recommendations here, but I can say that if you turn on billable time, it can become a hassle on your receipts and invoices so I don’t like turning that on unless I absolutely have to (and nonprofits likely don’t have billable time to worry about).
Advanced
This section is extremely important! This is where you’ll set:
- your fiscal year
- your accounting method: cash method = recognizing revenue and expenses when the money changes hands; accrual method = recognizing such when the service has been performed and payment is reasonably expected…the latter is more accurate and sometimes required
- if you want to enable account numbers – please do! It will make your life a lot easier in the long run, but it does take a little more time to set up (see some samples in the Chart of Accounts section below)
- if you want to track classes or locations (to be covered under the class implementation section below)
- automations, if you would like to utilize the ones offered
- projects – if you do have grants, you can use projects to track these
- date format, some functional items within QuickBooks, and what you want to call your customers (members or donors, most likely)
PHEW! That was a doozy. Remember that you can always go back and change pretty much all of this later if you don’t like the functionality upon setting this up for the first time.
Creating a Functional Chart of Accounts for Your Nonprofit
Moving onto one of the most important parts of using any accounting software for your nonprofit: setting up the Chart of Accounts. This is arguably my favorite part of bookkeeping as it’s part science and part art. I will caution you not to take too many creative liberties with your Chart of Accounts as you don’t want your financial statements to be unreadable or difficult to understand or too long. But a great Chart of Accounts will set you up for success, so that is why I’m always harping on this.
QuickBooks Online will automatically set you up with a standard Chart of Accounts that is generally usable by most nonprofits. Problem is, it’s wayyyy too complex for most of you guys. I highly suggest you take some time to use a paper and pen and map out all of your programs before touching any of this in QuickBooks. From there, consider what you have for income and expenses. You will need to group these things into a few major categories:
- programs
- fundraising
- administrative/general
You will likely have income generated from program fees paid into your organization if you offer classes, services, etc. In turn, that program income probably goes right back out to pay for supplies, rental space for your program, payments to contractors outside your organization, putting on your annual member meeting, etc.
Almost all of you will do some kind of fundraising or have contributions. The difference between those is that fundraising is a specific effort put on by your org to raise funds, while contributions may indeed be solicited but these are usually given out of the generosity of a donor (think of a business sponsorship versus having a bake sale – they are two different ways to get funds but a different type of effort goes into each). Also consider what expenses you have for these.
Lastly, you’ll have your organizational expenses that you encounter in the course of doing business and serving your cause. This includes things like insurance, professional fees, website, state annual reports, etc. These can really add up and I encourage you to try to have reserves in savings for the low points in your organization’s cash flow.
Here is a sample Chart of Accounts for a community gardening center:
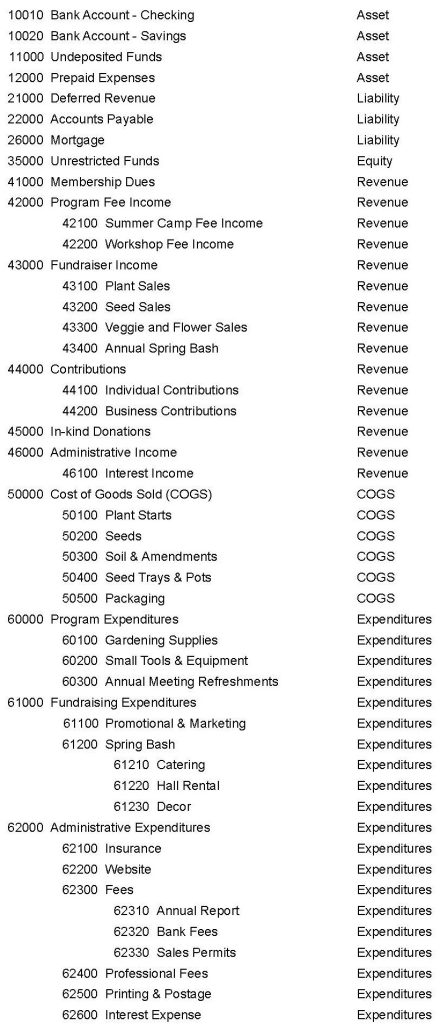
Here is a sample Chart of Accounts for a homeschool co-op:
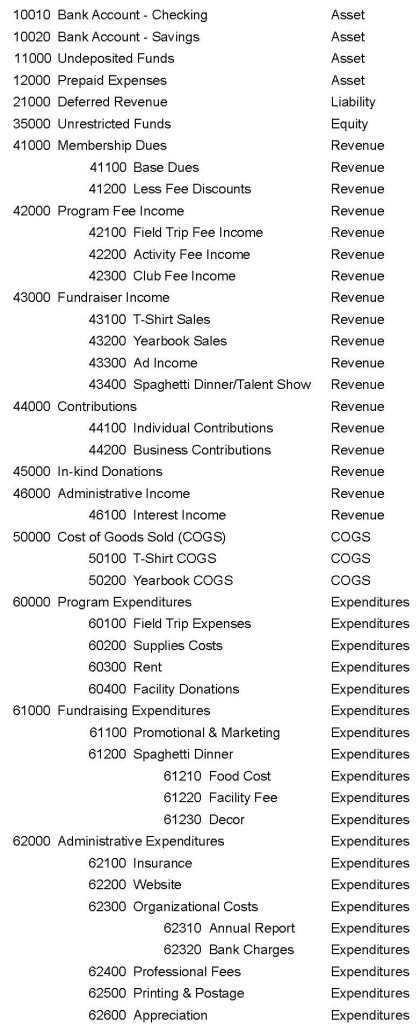
Here is a sample Chart of Accounts for a food pantry:
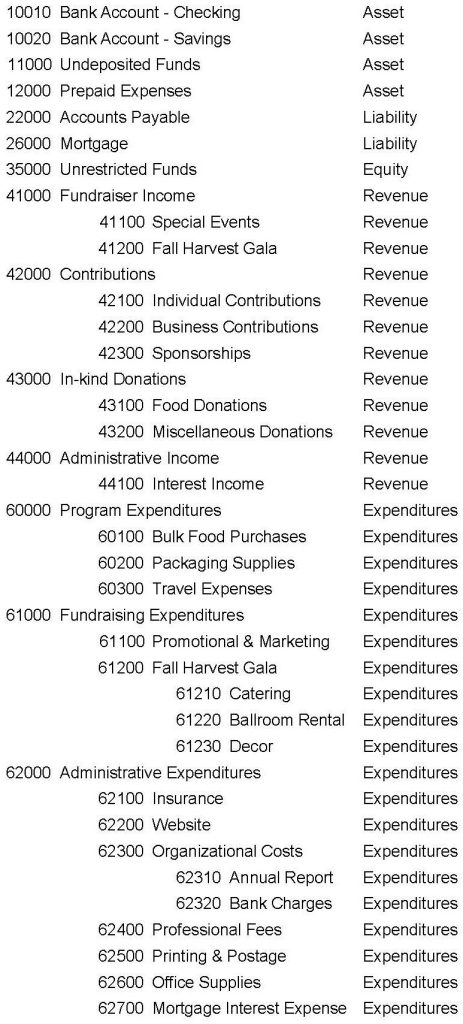
You might recognize many of these categories from a Profit and Loss (P&L), aka the Income Statement, and in the nonprofit world, the Statement of Activity. You will also notice that there are many more expense accounts than income accounts!
The other important financial statement for your organization is the Balance Sheet, and we will discuss all of this further down, but keep in mind that the Balance Sheet items need to be present in your CoA as well, so also consider what assets and liabilities your organization has and make sure these are added in. Here are a few examples, beyond what I’ve shown above.
Assets
- bank accounts
- cash (going the way of the dodo)
- accounts receivable (A/R)
- deposits you’ve made
- items you are owed that you prepaid for, such as insurance for the year
- a building or vehicle your entity owns
Liabilities
- services owed to members who have prepaid
- money owed to other entities (A/P, loans)
- a mortgage on a building or note payable on a vehicle
Equity
When it comes to small nonprofits, your main equity account is called Unrestricted Net Assets. This is what we refer to as Retained Earnings in the business world. No one owns a nonprofit, so there are no capital accounts for owners to add on the nonprofit Chart of Accounts.
Adding Products and Services to Your Nonprofit QuickBooks File
After your Chart of Accounts is set up, you will want to add whatever products and services you provide. You can find this section by going to Sales on the left and selecting Products & Services. When you click New, you will have a decision to make about what type of product you’re adding, so let’s do a quick run-down of what the options are.
- Inventory: This is a trackable inventory item. You have to have inventory tracking turned on in your settings for this, and it is a little more complex.
- Non-inventory: This is also referring to physical goods that you sell or use in the process of providing services, but it does NOT require tracking like it does with inventory items.
- Service: Most of your programs will fall into this category. You’re providing a service of some kind in exchange for the money your organization receives.
- Bundle: This combines other items together as a package deal (discounted or not discounted, it’s up to you).
Let’s go through setting up a service since that’s probably the most common one that readers will need to understand. After you select that it’s a service you’re setting up, the next screen will have you add a name for it, a SKU if you want (I’ve never used this feature), and assign it a class if you have turned on class tracking (more on this in a bit). You can set this up as a sub-service of other services; for example, our gardening center might have a parent category of “Workshops” and then more specific workshop names under that. Each workshop is its own product, such as Pollinator Plants of Florida or Air Layering Propagation for Beginners. Comprende?
Important note: You would not want to sell the parent workshop in this case – only the specific workshops! The same is true for your Chart of Accounts; when you use sub-accounts, the main accounts do not get things booked to them. This is really important so you don’t skew your categories and their respective cumulative entries.
So, once you have the name, class, and a parent product/service assigned, you will go down to the checkbox where it says “I sell this product to my customers” and make sure that is checked. Here you can add a short description that will show up on your sales forms. This also goes in the memo line when you’re entering transactions, so be sure to put something here that makes sense. You can also set a price here or not. If not, you will just enter it when making an invoice or recording a sales receipt.
The next part is very important! To the right of the price is a drop-down box to select which account this will be mapped to in your Chart of Accounts. This is why you need to set up your CoA first! You’ll need to select an income account here. For our garden center example, you might sell various workshops which would go under the 42200 Workshop Fee Income account listed on the CoA above. For a homeschool co-op, your annual membership fee would go under 41100 Base Dues. For the food pantry, a food donation from Publix would go under 43100 Food Donations, which is an In-Kind income account (in-kind = donation of goods instead of money, and yes, these do get booked as income to your organization).
You will also need to set up sales tax here. You should just be able to click through and set it as not taxable if your organization is exempt.
Lastly, you can also set it up to reflect that you also purchase items from a vendor. This is mostly applicable for inventory, say you sell calendars as a fundraiser. You can put the price you purchase them for in this bottom section, and the top part has the price you sell them for. This will automatically track your cost of goods sold (COGS) when you make a sale.
Setting Up Your Customers and Vendors
Each transaction will have a payor and a payee. If the transaction involves money in, your org is the payee and the customer (member, donor) is the payor. They are paying you something. If it’s money going out, it’s almost always going to be you as the payor and a vendor being the payee (an exception is when you do a refund).
Setting up your customers and vendors in QuickBooks Online is pretty straightforward. You are able also to add new ones when you’re booking transactions, which makes it so much easier when your file is on the new side. You can add as much info as you desire for these. From a nonprofit standpoint, I personally like to see customers (members, donors) set up with first and last name, email address, and preferably a mailing address so you can send thank you notes. For vendors, just a name may be sufficient for your purposes.
Implementing Classes in QuickBooks Online
Wrapping my head around classes took a small bit of effort because it was never really explained to me, but the point of using classes is that you can run a separate P&L for them and get data on a specific program. If you make that particular program a class in QuickBooks Online, you can see how much the program has taken in in fee income and how much they are spending and net the two figures without having to bust out a calculator. Think of each class being a mini organization in and of itself that has its own budget that you need to see reports on. You will always want to include a general budget as as class when you do it this way in addition to the programs you’re running.
For our sample gardening center, here are some class ideas:
- General Budget
- Teaching Garden
- Propagation Program
For our sample homeschool c-op, here are some class ideas. Remember that you could have subclasses under each class!
- General Budget
- Comprehensive Academic Subgroup
- Electives
- Art
- Band
- Chorus
- PE
- Clubs
- Photography
- Yearbook
- Service
And some sample classes we could use with a food pantry:
- General Budget
- Storefront
- Mobile Food Distribution
- Backpack Program
When you add classes, you’re functionally making your P&Ls into table format rather than just going line by line. Here is a very abbreviated sample for our gardening center, illustrating just the income portion:
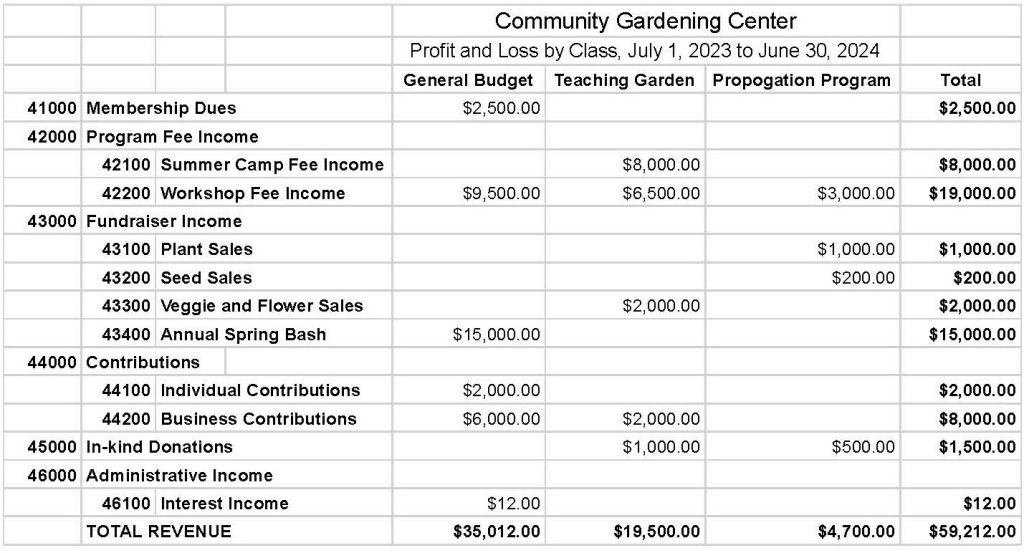
Notice how the main accounts do not have numbers in them! Only the sub-accounts have entries. In reality, when you run the P&L within QuickBooks, it will have totals at the bottom of each section that I did not show on my Google Sheets sample here.
When you use classes, you are able to create a budget that is multidimensional. If you want to allocate x dollars to a certain program, you can do that within QuickBooks Online. You can also use historical data to create your next budget, so next year’s budget creation process might be a little simpler once you have this all set up and have begun using it.
To turn on classes in QuickBooks Online, head up to that gear icon and click Account and Settings again. Under the Advanced tab, scroll down to Categories and toggle on the Track Classes button. Now you can set up your programs within classes and your reporting will be much improved!
If/when you have funds that are restricted, you can use classes for this as well. You create a class called Restricted Funds and each restricted donation, etc. will be a subclass so you can have all the reporting you need for compliance purposes.
Good Data = Good Information
Another thing I’m always harping on is how when it comes to data, garbage in = garbage out. Conversely, good data can produce good and useful information about which to understand your nonprofit. By implementing classes and utilizing a practical Chart of Accounts, all the data you will need is right at your fingertips – reporting for each of your programs, how much you’re spending to raise more money, how much your admin costs are, the list goes on.
Do not take a risk of guessing at how your organization is doing. This helps no one, least of all the people you desire to serve. But the power of QuickBooks rests in knowing how to get good information out of the data you input, which leads me to our next section: how to use QuickBooks Online reports.
Utilizing QuickBooks Reports for Nonprofits
Alright. Now it’s time to utilize this giant database of QuickBooks Online, pull out data, and format it into useable reports. Your main two reports, as I mentioned, are the Statement of Activity, better known as the P&L, and the Statement of Financial Position, also known as the Balance Sheet.
While you’re setting up QuickBooks Online for your nonprofit, you won’t have data entered into the program just yet, but soon enough, even with just a few entries, you will have information you can use to run reports.
Statement of Financial Position/Balance Sheet
Let’s say you make a bank deposit. Your Balance Sheet will be affected immediately upon doing so – you will have an increase in cash (well, your bank account, and these are assets) as well as an increase in unrestricted net assets (an equity account – I know that terminology can be confusing at first!). A Balance Sheet is a snapshot in time, so pick the date of your deposit (or a date after it) and run the report. BE SURE your report is only for one day…I’m not sure why QuickBooks allows you to run a Balance Sheet for a date range rather than just one date, but that’s above my pay grade. The report will reflect your deposit.
Statement of Activity/P&L
Once you have some income coming in, or maybe rather when you have expenses going out (ha! Such is the reality of a startup), you can run a P&L/Statement of Activity for a date range. This report is always going to be run for a range of dates, usually a fiscal year, quarter, or month. You can check out how much income you’ve brought in and what your expenses were for that period, and get a net income or loss down at the bottom…aka “the bottom line.” 😉
Budget versus Actual Report
You can also set up a budget, as I mentioned before, and compare it to your actual expenses in the same way. To set up the budget initially, select Budgets on the left menu panel, and you can choose which classes you want to utilize or just a consolidated budget with everything in one spot. As time passes, you can run the Budget versus Actual Report to see how well you are controlling costs and how well you’ve done with your solicitation efforts.
If you utilize classes, and I hope you do, you can run a P&L by class and also a Budget versus Actual by class. Play around with these features and see how much info you can get!! It’s pretty cool.
Connecting Your Bank and Apps
Since this article is about setting up your QuickBooks Online account, I would be remiss if I didn’t explain how to set up the bank feed. It’s very simple – you go to Transactions on the left menu and then pick Bank Transactions. You can choose Link Account and it will lead you through the sign-in process to connect your bank accounts with your QuickBooks account. You can do this with your bank accounts, credit cards, even loan accounts, and it will pull in the data for you to match with transactions you’ve already entered.
Let me repeat: It will try to match what is happening in your bank with what is happening in your QuickBooks Online file. It is NOT foolproof, and you should never allow QuickBooks to auto-add anything it thinks is matched. You should always manually check each entry before selecting “Match.” Do not just use the bank feed to create entries for you – you should always enter bills from vendors, invoices for customers, receipts for sales, and bank deposits BEFORE matching transactions. I cannot emphasize this enough. Auditors down the road when your organization is wildly successful will thank you for not taking shortcuts, so create these good habits now!
I also suggest not allowing it to pull in a lot of historical data when you’re first connecting it and setting the date for it to pull from with today’s date or yesterday, whichever one it allows (this may vary by institution). You can use the statements to reconcile, and it will actually pull those from your bank as well whenever they’re generated!
Any other software you might use in your work, you can see if there is an app that syncs with QuickBooks. On left menu, go all the way to the bottom and select Apps > Find Apps, and you can search there to see if there is an integration that will help you with your workflow.
Florida Nonprofit Accounting Consulting
I realize this is complicated. It can take some time to understand what you’re looking at, and also to learn how to use the program to begin with, so give yourself some grace as the learning curve can be steep, depending if you’re a person who is inclined toward these things or not.
I want to offer something I don’t offer to for-profits, and that is a consultation that covers QuickBooks Online setup and usage as well as nonprofit accounting concepts that you should be familiar with. You can just purchase one session, or a set of four sessions and we will check in together at certain intervals over your first year – the idea is that your fourth session will allow you some assistance with your year-end duties. Schedule your first call here. There is a short form to fill out before our call and you’ll need to indicate whether you’re interested in a single session or a 4-pack.
The fine print: This is only valid for small 501(c)(3) organizations with under $50k in annual revenue, filing an IRS 990-N, or that would be doing that in the future after getting off the ground (you must have already filed your IRS 1023-EZ and formed a nonprofit corporation with the Florida Department of State). This will be verified before you are invoiced.
Outsourcing Your Nonprofit Accounting
If you just want some help getting set up, I want to offer your organization a reduced fee for a QuickBooks Online Setup, starting at $100 – a discount of $50. This will be quoted based on your needs, but consider this an offer for $50 off the normal fee. To take advantage of this, please schedule a call here. Same fine print applies; thanks for understanding.
If you’re in a position where you’d like to outsource the bookkeeping for your nonprofit completely, I don’t offer any discounts for that as I’ve learned that nonprofits truly have more complex needs than many businesses and a constituency that demands a more prompt response to things, but I’m happy to chat and quote you my best offer.
You can start with my new pricing calculator that will give you a ballpark estimate for accounting services, including monthly fees as well as one-time costs for setup and/or catchup and cleanup services. Then, go ahead and schedule a call to discuss any questions you may have and we can get you going in under a week!
